Table of Content
Portland cement can’t work alone and isn’t made to work alone. It chemically needs an aggregate in order to glue itself together. If you use sand, you probably won’t experience any cracking at all after demolding. If you are using regular type 1 portland cement, you HAVE to use sand. I only seal concrete planters that I have created a marbling effect. I also might seal when using a white cement and want it to stay bright.
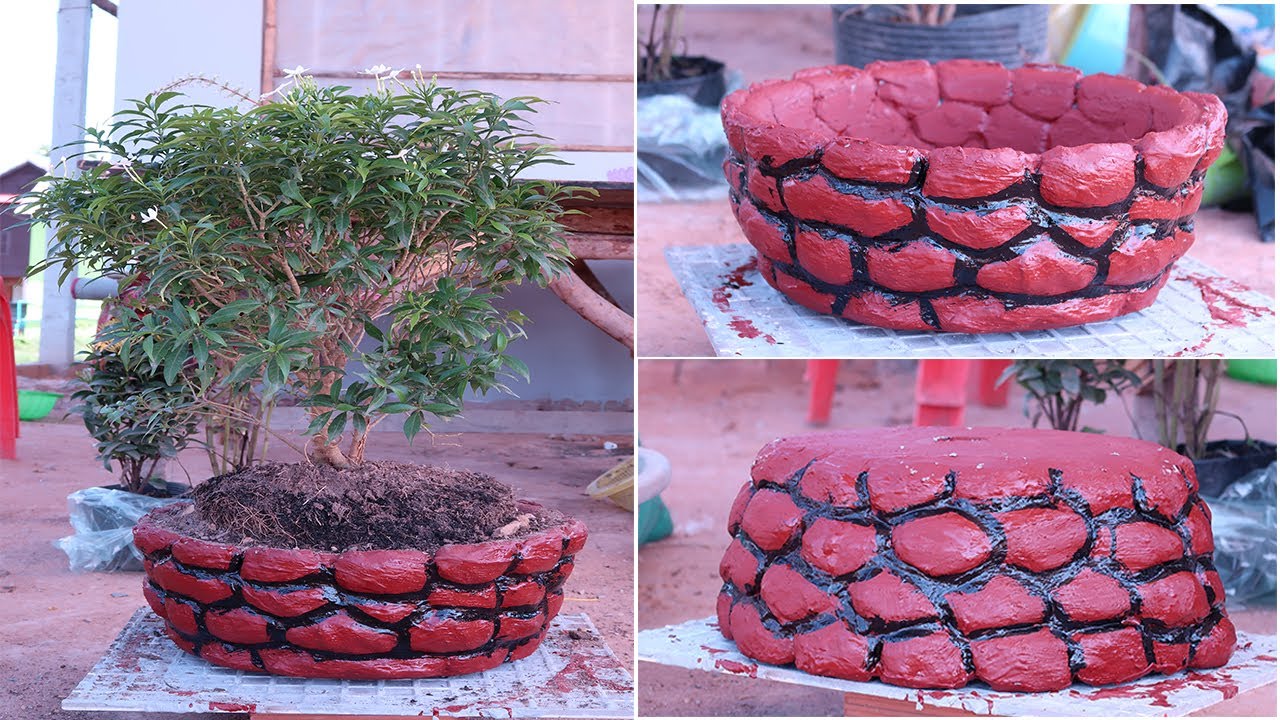
If you want to be safe, you can leach out the alkalinity by soaking the concrete planter in water for three days. The structure of your planter is now finished! All that’s left to do is fill it with your favorite plants and put it on display for all to see.
Step-by-step guide to creating a cement flower pot
But as mentioned above, you can soak the concrete planter for three days in water, to leach out the alkalinity to neutralize it. What are some other options for plants that are a safe container material? The best options are going to be pots that are porous. Yes, I added a drainage hole with a concrete bit. I got my molds from Lowes because they have those plastic pots in multiple sizes. Of course, the thicker the sides, the heavier the pot will be.

However, a large concrete planter box with walls 2” thick, may take longer than 24 hours. An undercut will make it difficult to remove the cured concrete from the mold. You can also utilize other materials for making concrete molds. This article discusses all the methods for making concrete molds for crafts.
Step 3: Fill the DIY Concrete Plant Pot Molds
Fill the larger mold with concrete to about one inch from the top. Shake to eliminate air bubbles; level the surface. Pull out the drinking straw to reveal the drainage hole. Let the concrete cure for the length listed on the bag of mix.
Then, take the smaller plastic container and oil the outside of it. But also keep in mind that you must also make sure to mix the cement or concrete so that there are no lumps. You will also need to vibrate the wet mix after you have cast your planter.
Creating Drainage Holes For A Pot Made From Concrete
Different shapes are possible, but keep in mind that if the container has a bevel that goes in and out again, that is called an undercut. But the short and quick of it is that you can reuse any plastic container that is straight or slightly beveled. Another danger to working with concrete is that the dry mix dust is harmful to your eyes.

A typical cement pots recipe is two cups of concrete or cement and about half a cup of water. This is the proper ratio for many mixes- if you are making a small planter. Spray it liberally over the entire surface of the concrete. Work your way down the outside of your planter.
Free Pocket Guide To Concrete Crafts Mixes
Once the cement is fully dry, you can start to separate the containers and the cement. If you used a paper carton as your container, you can simply peel it away. If needed, use scissors and pliers to separate the cement and containers. Pour your cement mixture into your larger container, whether you’re using a plastic container or paper carton. If you’re using a plastic container, make sure it’s oiled before pouring the mixture in.

Since these planters will be used outdoors, I sealed them with a clear acrylic sealer like this one, inside and out. For large planters, place an old clean t-shirt through the cap so it can reach the bottom of the planter. The string should not be pinched and there should be several inches coming from the top. The mix will take about a week to fully dry, depending on humidity, thickness, and how much water you added. The one above is about 4 days after pulling out of the mold so it isn’t fully cured yet. The color will even out and lighten as it cures.
If you don’t vibrate the mix, you will end up with either pin holes or pock marks . Another consideration in choosing a concrete mix is color. Some concrete mixes are white, some are grey from very light grey to a fairly dark grey. You can add an integral color when you mix the concrete or you can color with an acid stain after the concrete has cured.

How far you push in the interior container will affect the thickness of the walls of your finished concrete planter. How to make concrete planters- the ultimate guide for everything you need to know about making your own concrete planters at home. This in-depth article explains the reasons why your concrete pots keep cracking and how to prevent it.
Go round, vertical, oval, square, put a large planting space or a little one, whatever strikes your mood. Once you've mastered smaller projects, try moving on to larger pieces, like a concrete bench. For a simple design, use plywood and framing pieces to make a mold. The finished bench will be heavy so it'll probably need a permanent site. Toss on a few cushions to use it for seating, or make it a spot to display potted plants.

Some quick setting mixes will cure in about an hour. I much prefer to create a mold for the planter’s drainage hole, rather than have to drill it after the fact. The method you choose will depend on the size and shape of the concrete planter that you intend on making. I prefer using melamine since it has a smooth surface, which makes the concrete smooth and easier to demold.
Containers – You will need 2 containers, 1 for the outer and 1 for the inner mold. I used these plastic planters in various sizes, but these molds also work great and have a modern look to them. Place one container in another, after lubricating the walls with paraffin. Pour cement into the hole between the two containers. The inner mold must be stable in order for the cement to set properly.

You can run into situations where a cement pot needs to be wet cured if you are working in dry and/or windy conditions, or hot conditions. The way to wet cure concrete is to mist it with water and then wrap it with plastic after the concrete has been cast . Wet curing is simply keeping the cement and concrete moist during the curing process. There can also be mixes that are rapid setting, but not necessarily quick curing and can still take a day to cure. If you are looking for plants that are great for pots during winter, you can read about those here. You will need a way for water to escape and will need to create a drainage hole.


No comments:
Post a Comment